Perform these tasks before upgrading:
-
Perform a full backup of all OneStream databases.
-
Download Client Software and Self-Hosted Server (for on-premises installations) from Solution Exchange for the appropriate setup files:
-
Log in to Solution Exchange, and select Platform to get the latest version of OneStream.
-
Download Client Software and Self-Hosted Server (for on-premises installations) for the appropriate setup files for the server installation.
-
- Confirm the location of the OneStream configuration files:
- On a OneStream server, select Start > Programs > OneStream Software > OneStream Server Configuration Utility.
- Right-click the utility and select Run as Administrator.
- Select File > Open ASP.NET Configuration File and open the appsettings.json file from the following locations.
Web servers: C:\Program Files\OneStream Software\OneStream
WebRoot\OneStreamWebApplication servers: C:\Program Files\OneStream Software\
OneStreamAppRoot\OneStreamApp
The file opens and displays the path to the XFAppServerConfig.xml and XFWebServerConfig.xml configuration files.
Take note of the path to the configuration files. You will specify this location during the upgrade.
NOTE: This path is commonly set to C:\OneStreamShare\Config
-
Make a copy of the configuration files contained in this folder, and save them to a backup folder of your choice.
-
Close the file without saving and exit the utility.
-
Obtain the OneStream service account in Internet Information Services Manager. Note the Windows account and password because you will enter them in IIS after the upgrade.
NOTE: The service account must be an Admin ID or in the IIS_IUSRS Group, Performance Log User, and Performance Monitor Users group. The ID is required for queuing and CPU monitoring.
-
On each OneStream server, select Start > Control Panel > Administrative Tools > Internet Information Services (IIS) Manager.
-
Expand the server and select Application Pools. This displays application pools to the right. The OneStreamAppAppPool and OneStreamWebAppPool service accounts display in the Identity column.
-
-
Confirm the IIS OneStream App Server Site and OneStream Web Server Site Binding Information. If they are not kept as default and the type was http or https, the port number (and certificate if used for https) can be restored. This information will not be available if OneStream is uninstalled.
-
Confirm that the OneStream Database Configuration Utility is installed on each OneStream application server. Click Start > Programs > OneStream Software.
-
Confirm that OneStream is installed on each OneStream application server. Click Start > Programs > OneStream Software.
-
Install the following:
-
App Server and Web Servers
-
Install the latest version of ASP.NET Core Runtime (Hosting Bundle) (v8.0.x).
-
Install the latest version of .NET Desktop Runtime (x64) (v8.0.x).
-
-
Client
-
Install the latest version of .NET Desktop Runtime (x64) (v8.0.x).
-
-
-
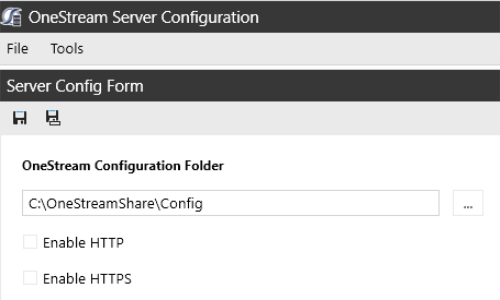
On-premises customers must enable the Trust Server Certificate for the OneStream Database Server using the OneStream Server Configuration Utility:
-
Select File > Open Application Server Configuration File.
-
Navigate to C:\OneStreamShare\Config or the location of configuration files from step 3e.
-
Open the App Server Config file.
-
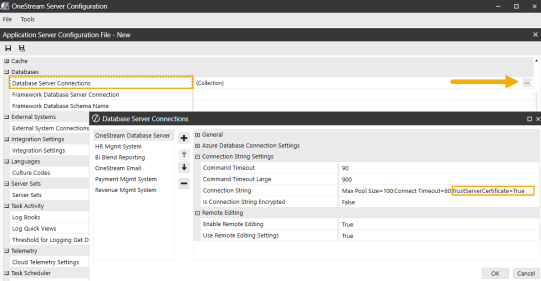
Locate Database Server Connections.
-
Click
 to open the Database Server Connections.
 -
At the end of the Connection String, add TrustServerCertificate=True.
-
Click the OK button.
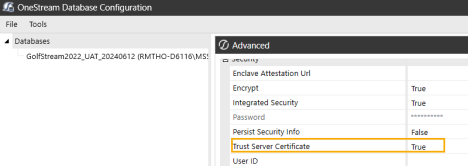
All Application Databases
From the OneStream Database Configuration Utility:
-
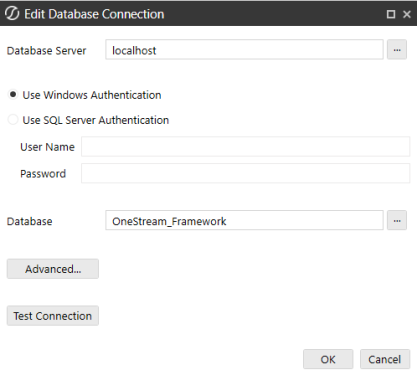
Right-click on a database, click Edit the Database Connection.
-
Select Advanced.
-
Set Trust Server Certificate to True, then click the OK button.
-
Select Test Connection to ensure a successful connection.
NOTE: Alternatively, set the TrustServerCertificate to True directly in the XML.

Repeat these steps for all Application Databases.
-


